The Beer Cave

I feel like a dun, dun, duuunnnn, should follow.

I'm sure some wives/girlfriends would cringe at the phrase, "beer cave", but from the beginning we took both Mike's wants and needs: accessibility, space, and function, and mine: has to look nice, into consideration when designing this little area.

While we had a little set back recently,


The space is done, and serving it's function, beer.


Mike made the necessary modifications to the freezer to turn it into a keezer.  He added a U-shaped collar that fit over the top of the freezer.  After spraying spray foam into the cavity of the collar, he drilled the holes for the taps.  He needs to add a drip tray, but they don't come in sizes large enough to span the freezer, so that's why he installed them all on the right side.

He also added casters to the bottom so that he can wheel the bad boy around, and needs to finish the collar so I can paint it.  I painted and polyurethaned, (due to the constant moisture), the tap collar using the same materials and methods as the steps.  For the wheel collar, I'll use our regular trim paint in white.
 

The collar adds a lot of height to the unit, and it barely fits, but it makes it past the light, so we're good.

The hump on the left, (under the basket), is where all the mechanical stuff to the freezer is, so Mike built the collar to allow his CO2 tanks to sit on the hump while still allowing it to close.  As Mike found out after his first spill while hooking everything up, the collar makes it pretty difficult to reach the bottom.  I'm kicking myself now because I didn't get a photo while there were butts in the air and heads in the freezer.


The new taps look great, and as you can see we can have up to 6 taps going.  We're thinking of how to add personal touches to the tap handles.


My mom gave Mike the rug in front of the keezer for Christmas.  While I usually make him keep the kitchier items out in the garage, I don't mind this one, but it was looking a little sad next to the massive keezer.


I was in Target running around like a mad woman browsing, when I found this Threshold rug on clearance.  I wasn't sure what I would do with it so I passed, but came home I realized the colors were perfect for this area.  So, of course I went back the next day to snatch it up. What, like you don't go to Target 2-3 times a week?


I think the layered rugs make it look a little more put together.


We still have to find a way to hang the temperature control, (the corded box sitting on top), and add a bottle opener, with some sort of cap catcher, (Mike's not a fan of the cute metal buckets - go figure).

One of the things that I've wanted to DIY from the planning stages is a chalk board beer tap menu.  I've been pinning some designs, and think that I've come up with a neat idea.  Before the collars and wheels were added I had a lot more space behind the freezer, but now it's getting smaller and smaller so I've had to modify my designs.  Now that the height is as high as it will go, (I hope), I can get to work.

I also added something small and personal to the area across from the keezer.


It's just the start of a little art moment in this hall way to the bathroom, (along the stair paneling wall), but I framed Mike's first medal from his homebrew competitions.


I picked up one of the Threshold frames from Target while they were 20% off and took out the glass.  I wrapped the backer with some linen fabric and draped the medal over it before putting it together.  I thought about taping the medal down, but I kind of like having it interactive to flip over to see the details of the award.


This wasn't Mike's first award, (or highest honor), but they don't always give medals, sometimes just ribbons no matter what place.  I liked the old-school feel of the medal, and it's fitting that it's across from his real prize.


I suggested I could frame more of his awards, but Mike vetoed that idea, so I'll have to think of some other things to put up on that ledge.  Or, maybe I'll have to start something to win my own awards and show him up!

Painting Wood Basement Steps

No pun-y title this time.  I figured with the lack of information I was able to find, I would make it simple for the next person who is trying to figure out how to paint wood steps.


The biggest decision I found was to poly or not.  All the paints that are recommended for floors are made so that polyurethane isn't needed, but I was worried about the wear and tear of steps that would see a lot of mixed action, (minds out of the gutters), like socked and bare feet, animals, and sometimes boots.  We've lived with our refinished floors for the last three years and the satin poly has held up to the everyday abuse.

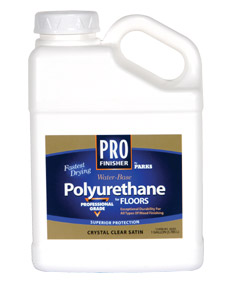
I found only a few suggestions and decided to go with Sherwin Williams Porch and Floor Enamel, (since that's what we used in the laundry room), and RustOleum Pro Finisher Water-Base Polyurethane for Floors in Satin.  I was able to get a quart at SW and it was less than $20, but the poly was $40 at Home Depot and was only sold in a gallon size.  I bought both in the satin finishes, since I like the look of satin instead of gloss.


Floor PaintFloor Poly

We decided on dark treads and white risers, so the first step was to primer everything.  Then, I painted all the risers, trim, and paneling with 3 coats of our go-to trim paint, SW Pro-Mar 200 in semi-gloss, (un-tinted).


Next came the dreaded tape.  I'm not a taper when I paint, (I hate the extra time and clean-up and I have a pretty steady hand), so I was not looking forward to this step.  I actually used Frog Tape for the first time because all the bloggers are doing it, and I've had some bad experiences with the regular blue stuff.

Being a perfectionist, this took me forever, seriously, like 4 or so hours.  There's nothing worse then thinking you've got a nice clean tape line and then peeling it off to find a wonky line underneath.


I chose Seal Skin (SW7675) since it was almost black, but had a warmer tone than some of the other swatches we brought home.

Sherwin Williams Seal Skin SW7675 

I had planned to be smart and paint every other step so that I wouldn't be stuck downstairs, but it must have been the fumes that made me mess such a simple task up:


I actually just painted the next step down so we got a good stretch in when we went back upstairs.  After a couple hours, it was dry to the touch and was able to be repainted for a second coat.  Two coats was perfect coverage, so the next day I was able to paint the rest.


We could have stopped there since the paint is made for floors, but I was leery and read some reviews that the paint stayed tacky for a long time, so I went for the polyurethane for extra durability.  I got a little freaked out seeing my nice dark floors turn blue after the first coat.


The key to the poly is thin coats.  I used a foam brush for the edges and a foam roller for the rest.  This time I remembered to count and did every other step.  The poly dried quickly and was ready for another coat after an hour.  The label says to not do more than two coats, so I stopped there.  It also said that after 8 hours you can have light foot traffic, so by the time I finished everyday, the next morning we were good to go.

The landing in the middle of the steps created a problem since there was no way we could jump over that with only wet steps around, so I had to do that separately, and got some more stretching in when we jumped over that one for the night.

I'm really glad we did the poly since the floor paint was picking up everything.  I tried to take a (porrly white-balanced) photo to show the difference in just the dirt collection of the two surfaces.  The step on the right and the third step from the right have poly, while the second and fourth just have paint.  All are cured and were walked on with bare and socked feet. 


Every little piece of dirt, not to mention sock lint, stuck to the paint.  The only reason I could see someone not wanting to add polyurethane would be for fear of slipping, and while the poly is definitely not as sticky as the paint, it's not that slippery either.  It's actually a lot less slippery than our upstairs that are stained and finished with a Bona satin poly.


As for the tape, I knew it wasn't going to be perfect, but I kinda hoped it would be so that I could be done with these bad boys.  Every time I had to paint I would wake up sore from twisting and bending in weird positions to paint the nooks and crannies.  I'll probably have to get two small paint brushes, one with white, and one with black, and fix all the little imperfections.  I'm just glad to be able to walk up and down the stairs and not have to stretch over two or sometimes three wet paint steps.


We're both really happy with the results and I love the crisp white and dark contrast.


The lines along the risers are pretty crisp, the ones I want to touch-up are mostly along the trim edge.  For normal people, it would probably be fine the way it is, but as Mike would say, I'm crazy, so I see the little imperfections every time I walk downstairs.


One of the thought-provoking decisions we had was how to stop the stair tread paint from the ledge above the paneling.  Something we definitely didn't think about when we were building.


I decided the only way was to tape it and paint it to match the rest of the exposed treads.  I measured the other steps and taped the same distance to make the illusion like it was the same.  It's not ideal, but it's the only thing we could come up with.


The frog tape was awesome here and made a perfect, crisp line.


I did notice that along the trim there was some wrinkling though.  I'm not sure what caused this, but I saw it here and another spot down a couple stairs.  Mike thinks I may not have let the dark paint completely cure before painting the poly, or that the polyurethane was a little thick along the edge.  I didn't do anything different to these steps than I did the others, so I'm not sure.


Either way, the fake edge looks a little weird up close, but the further you step back, the less noticeable it is. 


To finish everything off after cleaning up the lines we need to add a hand rail, build the doors to the built-ins, and create a little landing area for shoes and stuff.


Mike's biggest issue is now that the stairs look so great, the trim around the door to the basement, (that we had to remove to replace/fix the drywall down the stairs), doesn't look up to snuff of the rest of the renovations.


We decided the best thing to do would be to finish this off when we remodel the kitchen, (our next, and hopefully final, major project).  It bothers Mike to have such an unfinished entrance to such a great new space, but I warned him that under no circumstances will we be starting the kitchen project before our wedding this summer.  We have about 4 months to go, so we'll see how long Mike can hold off his sledgehammer. 

FLOR Me

When we finished installing the floor in the basement the last thing I wanted to do was cover the whole thing up with a giant rug.


While I would love not having to buy a rug or to sweep it, it's definitely a necessity down here where the temperatures are a lot cooler than upstairs.  It's also needed to break up the dark floors and dark couch.


During the planning process I knew I needed something that was inexpensive, very durable, (it's a basement after all), and also looked good.  I've been having major buyers remorse over the rug in our living room upstairs for some time now, (hating the swirls and color), and I wanted to take my time picking something for this new room that I would love. 

When we moved in, the basement was covered in carpet squares that were originally glued to the concrete, but had lost their adhesion years ago.  They were gross and shifted when you stepped on them.  As far as a dingy basement they were great, because we spilled things on them, Benelli marked a couple, and we wore our dirty boots all over them without care.  When they got too gross, (ahem, Benelli), we would throw them out.  They were nice for working down there so that we didn't hurt our backs walking on the hard concrete.

Even with the nightmare of the gross carpet squares that we inherited, I couldn't help but notice all the bloggers who were falling in love with FLOR capert tiles.  I liked the idea of being able to wash a square if there was a mess, and the fact that I could simply buy a new square if it was totally damaged was also a win.  With a kegerator not 10 feet away, I figured for my piece of mind, and against Mike's protests, I would add them to my potential rug options.

After pricing out a 13' x 9' rug, (ridiculous!), I turned to FLOR and decided to get some samples to see for myself if they could work.  I picked out 6 samples with free shipping for $10.


I was surprised by the quality of the samples and then did the slip proof test by removing the sticker from the back of one and stepped on it.  The backings aren't sticky, they just have a slight rubber feel, but when you put your weight on it, it doesn't move around.

While I like most of them, (Finer Things - Flaxen was too green, and Family Tree - Stone was not doing it for me at all), we narrowed down the 6 choices to 2:


Both Mike and I picked Twill Ride as our favorite, but I was worried about the white getting too dirty, and I also was worried that the white/silver was too similar to all the colors we already had going down there.  I liked the chevron pattern of the Suit Yourself, and the texture was a little more comfortable than the dense Twill Ride.  I hoped the subtle green and creams would add a nice texture layer. 

So, in the end I was going to sit on my decision for awhile, but when I saw a free shipping promo on the website I decided to bite the bullet and get 41 tiles to make a 8' x 13' rug, (5 tiles x 8 tiles with 1 for stock).  At $10 a piece it wasn't a small bill, but it was a reasonable price for the size.  The free shipping was also nice.

 Style Name and Color
Qty.
Price
Total


Suit Yourself - Linen
41*
$10.00
$410.00
Subtotal
Shipping
Tax
Order Total
$410.00
$0.00
$26.65
$436.65
*The following product(s) are currently backordered

Suit Yourself - Linen (41)

Backordered products will ship as soon as they arrive in our warehouse.


What wasn't nice was the backordered asterisk.  I ordered them on March 26th and after a phone call was told they wouldn't arrive to the warehouse until April 22nd :(  To my surprise I got an email last week notifying me that they shipped and would arrive on Monday!  So, Monday night I raced home to find 4 boxes on the porch.  And, like any good instagrammer, immediately took a photo.  


I shleped them downstairs myself, but waited for Mike to come home to help me move the couch around.  I love that darn sectional, but man, is it a bitch to move.

There are tons of tutorials, but essentially we moved half the couch, then laid out the tiles, then picked up the corners and added the stickers.  Once we got to the other half, we moved the couch around and finished it off.  It was really easy and was done in about 30 minutes, (including moving the beast of a couch around).  I had bought 41 tiles for a 8 x 5 tile grid, but as Mike pointed out, we didn't need them under the back part of the couch where it would never be seen, so instead of 1 extra, we have 7.  I suggested returning them, but Mike liked the idea of having all the extras for insurance down the road.

Mike is indifferent to things like rugs, but I love it.


I was hoping the color would be different than the wall color, but in mass it looks very similar.  It's okay though, after living with it so dark down here for so long, I don't care if everything is light.  I love the pattern and texture though.  We chose a parquet pattern and rotated every other 90 degrees.


We have to live with it for more than 72 hours for the real test, but so far so good.  We don't mind the unfinished edge, but Mike's a little wary about it showing abuse from walking.  We'll see how it holds up over time.

From a comfort level its great, even though it's been warmer here, it's still a lot cooler downstairs in the basement and standing on the floor vs the rug is a huge difference.  It's also the perfect layer to start adding more textures and patterns into the room.  Throws and pillows here I come!


Filling Holes and Taking Names

Last week I showed the family room as we're using it now.  We've still got a long way to go, but we'll be doing it in stages and I'll be sure to share everything along the way.

The first thing I wanted to do was explain the big hole in the wall.


Technically, there are two big holes, but the bottom left, (the clean-out for the sewage drain), got an access panel cover and is covered by the sectional, so I don't have to worry about that one.  The other one is a little more noticeable.  It's a weird placement, but it's actually our circuit breaker box.


When we moved in it was actually completely covered with a wall to wall built-in.  I'm not sure how they ever reset any breakers, but I'm 100% sure it wasn't up to code.


While I liked the idea of never seeing it, we do need to access it.  Mike wanted to create a hinged door, but I had a better idea and asked him to just frame around it and leave it.  He wanted to add some insulation since that's an exterior wall and decided to get all MacGyver and create a little piece that could easily be pulled out.


First he cut a piece of rigid insulation down to the size of the hole, then cut a recessed area in the center about half the thickness of the insulation.  Then he screwed a handle onto a piece of wood the same size of the recessed area.  On the back he added another piece of wood and screwed the handle screws through.  It should be noted that he figured out the total thickness first, then found screws that were long enough to screw through it all.


That's why I keep him around since I knew how I wanted to conceal it, but I never would have thought to insulate it.  I probably would have always wondered why the spot on the couch underneath would have been cold all the time.

After we moved the couch downstairs I was itching to do some decorating and figured it was about time to get rid of that eye sore.

I decided long ago that I would create a gallery wall above the couch on that wall and would strategically place a frame over the opening.  Well, last week I bought some frames from Target and got to work.  The only frame I specifically needed was one bigger than 17"x21", the size of the opening.  For the rest, I just bought some I liked.  The other element I knew I wanted to add was a metal letter 'M' Mike salvaged for me a while back from an old building, (along with some other letters).
 

Since both our names start with the same letter, I thought it would be cute to use it downstairs on the gallery wall.

All we've been doing for the last couple of weeks is patching and filling holes in the drywall downstairs, and I hated the idea of putting more holes in the walls with all my pictures.  I was also worried about the picture over the electrical box, since it needed to cover the hole and I couldn't worry about where the nail needed to be.  I had so much success with the command strip hanger that has been keeping my sunburst mirror from killing us in our sleep, that I figured that would be the best option for the gallery wall as well. 

Like I usually do, I first laid all the new frames out on the floor until I came up with a configuration I liked.  Then, I snapped a quick photo with my iPhone because I knew 3 seconds after picking them up I would forget that configuration.


I left some space between the frame on the left and the two smaller frames for the metal 'M'.

When it came to actually attaching the pictures, I started with the big black frame, since that would dictate the rest of the frames.  The frame was only about an inch or two bigger than the opening so there was little drywall space around the opening for the metal hanger, so I used four strips of velcro.  I figured this would make it easier to take off and on when we needed to.

I first stuck the command strips onto the velcro, then put two pieces of velcro together, and slapped it onto the frame.  I should have thought for a second before doing it and placed them a little closer to the edge of the frame since they barely fit on the drywall, but thankfully they worked.  Then, I removed the paper backing to the other sticky pieces and using a level placed it right over the opening.

After that frame was up, I cut some kraft paper the same size as the other frames and the metal letter and just taped it up on the wall where I liked it.

 
Since I was just using command strips nothing had to be too perfect and I just eyeballed it.

The other frames all had those little sawtooth hanger things on them and I had planned to get more of the metal hangers, but found these plastic sawtooth hangers at Target, plus they were all on sale!


I drew where the sawtooth hanger was on the kraft paper and poked a hole through the paper and lightly indented the wall.  After I took the paper down, I stuck up the command strip and was good to go.

For extra strength I did use the metal hangers for the letter M.  It's probably only about 5 pounds, but scared me more than the frames.  Since the letter originally was fitted to permanently hang on the exterior of a building, it didn't have any sort of hanging system on the back.  Mike cut a couple pieces of scrap metal to fit the top points and used epoxy to adhere them together.  We waited a full 24 hours before hanging it just to be sure.


Since the instructions on the command strips say to wait an hour before hanging we went to hang out with my sister and hung everything after we got back.


I love the gallery wall.  Like, more than I should love any frame collection.  While I still have strong feelings for my corner wall shelves upstairs, I like this collection better because it feels more collected over time.  I also like the mix of wood and metal.

I almost have all the frames filled, (which is a miracle in this house since our dining room frames have sat empty for years), and my biggest critic, Mike, loves them.

Starting at the right I remade a vintage looking poster from the prohibition days.  I had to remake it to fit the frame we wanted, plus I wanted to add a little personal touch.


Our godson's name is Marshall, so I purposely misspelled 'United States Marshal' as a nod to the little guy.

 
The little frame to the left has the international signal code alphabet for Mike's grandfather, who was a signalman in the US Coast Guard during WWII.


And finally, Mike's favorite, the Humulus lupulus botanical print.  Better known as hops for those who don't live with a nanobrewery in their basement.


For the last frame I'm thinking of a construction blueprint, either photoshoping one of Mike's project prints, (since we don't use blueprints anymore), or copying one of the blueprints from the storage room in my office, since we have prints from a couple buildings my boss owns that are well over 50 years old. 

I've never filled frames up this quickly, but I think once I was able to think of a couple things that were sentimental to us, it was easy.


I've got something big planned for the wall behind the couch, and I just received an email letting me know that it shipped on Friday, so I'll let you know when it arrives!