
After the drywall was finished, it was time to mud. Mike's the drywall extraordinaire, so I let him do his thing. Plus mudding falls into that category of "messy things that don't easily wash out of clothing", so it's better that I don't watch. After everything was mudded I was called down again to help with ceiling texture. Since we tore out all the ceilings on the second floor, and just recently did the ceiling in the new bathroom, we knew what we were doing, and most importantly who's good at what. Mike's the roller and I'm the stamper. Since I didn't explain how we did it for either of those projects, I figured now's as good a time as any to make a tutorial.
First, you have to decide what type of texture you want. This isn't the most important design decision you have to make, but have you ever looked up in a room and saw a popcorn ceiling and cringed? Yeah, don't be those people. We prefer a knockdown look, because it's simple and more modern, which is basically adding a stamped textured, then coming back and, you guessed it, knocking it down with a squeegee, don't worry pictures are coming.
First, you want to gather your supplies,
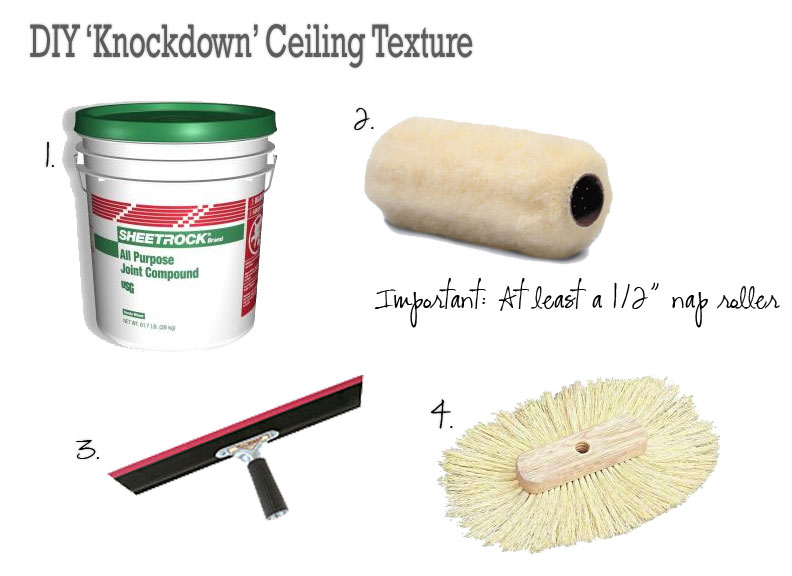
1. Joint Compound | 2. Roller, (the thicker the nap, the more texture) | 3. Rubber Squeegee Knockdown Knife | 4. Oval Single Texture Brush
After gathering your supplies, you need to prep the ceilings. Since Mike already mudded all the joints, he roughly sanded everything to a smooth finish. Since you're covering it up with a texture it doesn't have to be perfect, but you don't want any noticeable edges that may show through.

You should probably not be a dumbass and wear safety glasses during this. Nobody likes extra fine joint compound dust in their eyes. Heck, you should probably wear a full mask, even if you are just taking pictures, that stuff gets everywhere.

Next, quickly wipe down the ceilings to throw even more compound dust in the air to fall and get everything dirty. We've cleaned this room probably 5 times already, but, I'm not bitter.
Now comes the real stuff. We use premixed joint compound, so Mike just slaps some into an empty bucket and adds a little bit of water to thin it out. The point of thinning it is so it easily rolls onto the ceiling. TIP: Buy one of the those rounded trowels you see Mike holding. It's made specifically for scraping buckets.


After you add the right amount of water, (Mike's done this a few times to he knows how much to add, but for someone doing it for the first time I'd add a little bit at a time, maybe a cup or two each time for a half of a 5-gallon bucket), you use a drill attachment to mix it up.

The consistency is thinner than peanut butter, more like brownie batter. You know, easy enough to pour, but you still need a spatula to spread it all out. Definitely thicker than paint, even the really thick primer stuff.
Then you use a roller attached to a long pole to dip into the mixture and coat really well.

After the roller is thoroughly loaded up, start rolling onto the ceiling. Mike likes to work in square sections, making sure the area is evenly coated.

We only had a smaller nap roller on hand so Mike went over the area a couple times to coat it. You're looking for a thin, even, layer, about 3/8" thick. The thinner or thicker you coat it, the lighter or heavier the texture is going to be.
While Mike was rolling, I was mentally preparing myself for the very important task of texturing. Actually, it requires little thought at all and is pretty fun, (my kind of tasks). I waited for Mike to finish the whole length and about a 4 foot section before I got to work.
It's important to have one person do the textureing, because once you find your groove, it's going to be unique and adding someone else, will yield a different style. That's why I like to say I have the most important part of the job, although I usually don't say it out loud. Don't want to bring down the morale of my partner.
So, I'm up and I use the brush and firmly stamp it in the wet compound keeping the brush flat. The roller leaves the veiny looking texture behind, but you're looking for the stippled effect.


The oval brush leaves an oval negative space in the middle, so as you stamp, you need to rotate the brush so everything has a uniform texture.
By the time I'm done stamping my section, Mike's done with another 4' section, so we move down the room together. Make sure to get all the ceiling, including the edges, it may get on the walls, but it's worth it.
Depending on the size of the room, (and how long it takes you to roll and stamp), the next step may require some waiting time. Since the room is pretty big and Mike took his time rolling on the compound, (due to the smaller nap), we only waited a couple minutes before starting at the beginning of the room to do the knockdown.
The knockdown technique takes some practice. Mike's got it down, but I wouldn't attempt it without practice on a piece of cardboard or something. The compound needs to be stiff, but not completely dry. The squeegee is used to flatten the pointy edges of the stamp, but you don't want to wipe everything off by doing it too early. Mike usually uses his finger to test a spot to see if it's dry enough. If it sticks to your fingers it's too wet, it needs to come off somewhat clean, but have a little resistance when you touch it.
Make sure the squeegee is clean, and holding it at a 45 degree angle, lightly wipe across the ceiling. As you can see in the picture below, there's a small sliver of light between the squeegee and ceiling. There's not a lot of pressure used, you're just skimming the very top to flatten those points.

Mike does one pass at a time, about 4' in length, to maintain control. He cleans the squeegee off with a clean towel ofter every pass.

This part takes some patience, but goes really quickly. You don't want to be too long, because the other side of the room is drying while you're working. If the compound dries completely, (which you would have to be really slow for that to happen - it's usually too wet and requires waiting), it won't work, and you'll have to sand it to get the same texture.
After the room is rolled, stamped, and knocked down, Mike takes a flat edges trowel and scrapes along the edges of the ceiling to get all of the compound off of the wall. It's easiest with a trowel because you can start with the trowel up in the corner and scrape down, making sure that all that hard earned texture remains.

I know this post is getting lengthy, but I also wanted to share how to retexture a ceiling since many may not be installing new ceilings all the time. We kept the ceilings in the stairwell, but had cut holes for wiring and lights so we wanted to add new texture. We also wanted it to match the new ceiling down the stairs more so than the stipple texture that was already there.
For most, the knowdown look can be achieved with simply sanding all the pointy edges down. But like we had, there may be holes that needed to be filled, so we textured over everything. The only difference between new texture and retexturing, is the thickness. You want to first sand down all the point edges, (if you have popcorn ceilings, first let me me say I'm sorry, but that also means you can completely remove the popcorn and start over as if it was new), this is only necessary if you have a texture like the rosebud:
 |
| via |
After sanding all the points down, you want to follow the same steps above, but apply a much thicker layer of compound. A thicker nap roller will definitely come in handy for this. Then you will have to stamp a little bit lighter since you have a thicker layer. And, then wait a little bit longer for it to set up before knocking it down.
We did it in the steps first and the only difference was the space was a little tighter.

We kept it a little lighter in the steps than what I suggested for retexturing because after sanding down the original ceilings, it was pretty much the look we were going for. The point of redoing it all was to blend the patched holes.
After letting it dry overnight I was able primer and paint everything over the next couple of days. Since I've bored everyone to tears with such a detailed tutorial on ceiling texture I'll leave you with a look at the lights we were able to install after the paint was dried.

These bad boys are amazing and have made such a difference in the room already. It's made the late nights working down here almost tolerable. Or at least tricked us into thinking it's not as late as it really is with all the light.


Mallory, thanks for the blog on the textured ceilings. I have textured ceilings and need to know what you suggest for patching a ceiling spot that was ruined. I tried to use just joint compound and it is so thick and is an eye sore. Also, I have no idea how the stamp was made in the ceiling. How do I know what brush to use to make the same stamp? Thanks Elisa
ReplyDeleteUnfortunately, there's no good way to patch a textured ceiling. Your best bet is to re-stipple the entire ceiling. Not something you want to hear, but it's the best way to blend in the patch. As far as finding the same brush, I would search online to see different patterns and try to match yours. Also, you may be able to bring a picture in to a hardware store to see if they can help as well. We usually have more help at local hardware stores over the big box stores, but it all depends on the employees. Good luck!
DeleteMallory-
ReplyDeleteI know your original post was 3-yrs ago, but I am dealing with a stamped-on-top-of-a-swirled ceiling. Since you have worked with rolling compound on a ceiling, do you think that if I rolled on a layer the consistency of browning batter, it would cover the texture or at least create a new one that's close to being smooth?
René, I asked my resident expert (Mike) and he said yes, it's possible! If you roll on a thicker-consistancy compound you'll be able to cover up the texture (depending on it's aggressiveness - big stipples, or smoother finish). This will give you a texture that's similar to what's usually used in closets (see a picture here: https://s-media-cache-ak0.pinimg.com/564x/7b/0e/95/7b0e95912230c89980b0776a5dfa5ae6.jpg). Worst case scenario is that it will take 2 coats to really cover the previous texture, but you should be good to go!
DeleteThey also make decorative textured rollers if you wanted a more traditional look: http://www.amazon.com/DW184-Decorative-Texture-Roller-Tree-Bark/dp/B000PC3X48/ref=as_li_ss_tl?ie=UTF8&refRID=19PB80Y4G8QJKPJZFP6B&linkCode=ll1&tag=daho0e-20&linkId=0cf37bda0c2537480ea5c1d1eb48c97b.
Hope this helps, and let me know if have any more questions!
I think I may at least try test patch.
DeleteThanks!!
What type of lights did you install? They look like they give off a lot of light!
ReplyDeleteOh goodness... Thank you for your article!! I attempted to remove the popcorn in the bathroom of my 1964 house to discover it had been painted over (more than once)... Since I can't get the smooth look I wanted, I came to Pinterest for retexturing ideas and found you. Now I also know I can cover the rest of this ugly popcorn all over my house! Thank you from a lady who has spent 2 days trying to scrap a ceiling...
ReplyDeleteWe bought a 1970's house with a crazy textured ceiling. I think it is something the homeowner did. It isn't popcorn, it is like they slapped up some compound all over the ceiling and it is rough and has peaks. We have no idea how to get rid of this. Do you have any suggestions? We're trying to do everything on a very limited budget so if money were no issue, we'd just have a new ceiling put up. We have no drywalling experience. Any thoughts?
ReplyDeleteThank you - Marie
Hi Maria, this is an older comment but I hope I can still give some advice. First you can check to see if they painted over it by sanding it a little bit. If you're able to sand some of the peaks off, then you have options to smooth it down a little more (the more muscle, the smoother you can get). We were lucky in our new home that they never painted the ceilings so this is what we chose to do.
DeleteIf it is painted, it can be harder to sand and I would suggest skim coating it with a very thick layer of mud and then stamping/knocking down. Without seeing your texture it's hard to give specific advice, but you may not need to stamp if the rolling texture over your crazy texture looks okay. Neither method is very expensive, it just takes a lot of labor. Good luck!
Just a small comment to say the ceiling turned out great. Great pictures great blog keep up the good work.
ReplyDelete