

Sometimes the greatest lessons are learned the hard way. But, that doesn't mean I'm not going to share everything we learned so that some other poor sap isn't left yelling at their husband at 2 am when the cabinets have to be ripped apart because we didn't see that stupid little drill hole facing the other way! I know there's at least one of you out there that feels me. Here are our tips and tricks for ordering and installing an Ikea kitchen.
Pay for the delivery. Seriously. We live and hour and 45 minutes away from the closest Ikea and it was $139. We had 140 items including a dishwasher and 4 large panel covers each 3'x8'. It would have taken a couple of our friends with trucks, a lot of gas money, and a lot of food to feed our workers to cover all that.
Make Spreadsheets. My copier at work can scan and convert to an excel spreadsheet, so I scanned in my order and used the information to make a couple spreadsheets.
Take Inventory. As the guys are unloading everything take inventory. I made one spreadsheet with all the pieces that were being delivered. I grouped all like items together and then did a count as they came it. I called and let the delivery company know that I was going to do this, (not necessary, but I already was on the phone with them), and it's a good idea to prepare the guys on the truck. We had 2 delivery guys and since they parked on the street and had to walk back and up the deck they only brought in about 5-10 items at a time. I had a couple minutes between the next load to count and mark off all the items. We had a total of 140 items and with my checking, and 2 guys unloading, it was done in and hour and 15 minutes.

Label the Boxes. I had one item missing on my initial delivery inventory, but we wanted to group all the items together by cabinet numbers so I made a second spreadsheet with all the items labeled by cabinet number. Mike read them off while I called out the cabinet number and he labeled and placed them in like piles. Turns out my delivery inventory was correct, but we found a box that was damaged, (something I didn't see when the guys brought it in). This was necessary for customer service since our goal was to not have to drive back and replace on our own.

READ and Reread the Directions. Or rather look closely at all the picture directions Ikea uses. The first cabinet Mike built was the corner cabinet which has two pieces that look similar but one has holes drilled on the edge. You guessed it, he put them in the opposite positions and attached the back with all the little nails. He cussed for a long time after that little discovery. He actually decided to drill his own holes and it worked out, but he had to remove the backing on one or two more cabinets, (the butt of the hammer handle works well for this). After putting together 1 1/2 cabinets he was an expert so he flew through the rest, but since Ikea's a little European let's say, there was definitely a learning curve, even for the most skilled carpenter!

Build In the Order of Your Design. I printed an 11"x17" layout and labeled each cabinet number. Our order had different numbered cabinets than my design, (the woman ordering must have gone in a different order), and Mike had this at his side while he put all the bases together. This helped us just to understand what we were putting together, which made the process smoother. The uppers are all the same pretty much, so it was easy to say, "Okay the next one is just the 24" version of the last one you did." Not really necessary, but this helped us.
Google, Google, Google. Find blogs that have done Ikea kitchens, there are so many out there. Read the forums before undertaking even the purchasing. There are a lot of little things that we discovered after putting everything together that I found people had the same problems as we did. It's hard to know what to search for before it becomes a problem, but doing your research will hopefully highlight these nuances before you start.
Don't Attached Cabinets Together with the Fourth Hole! Learn from our mistakes. You must drill and attach the base cabinets together but it doesn't tell you where to do this.

We used the same directions given to attach the side panels and drilled in the 4th holes.
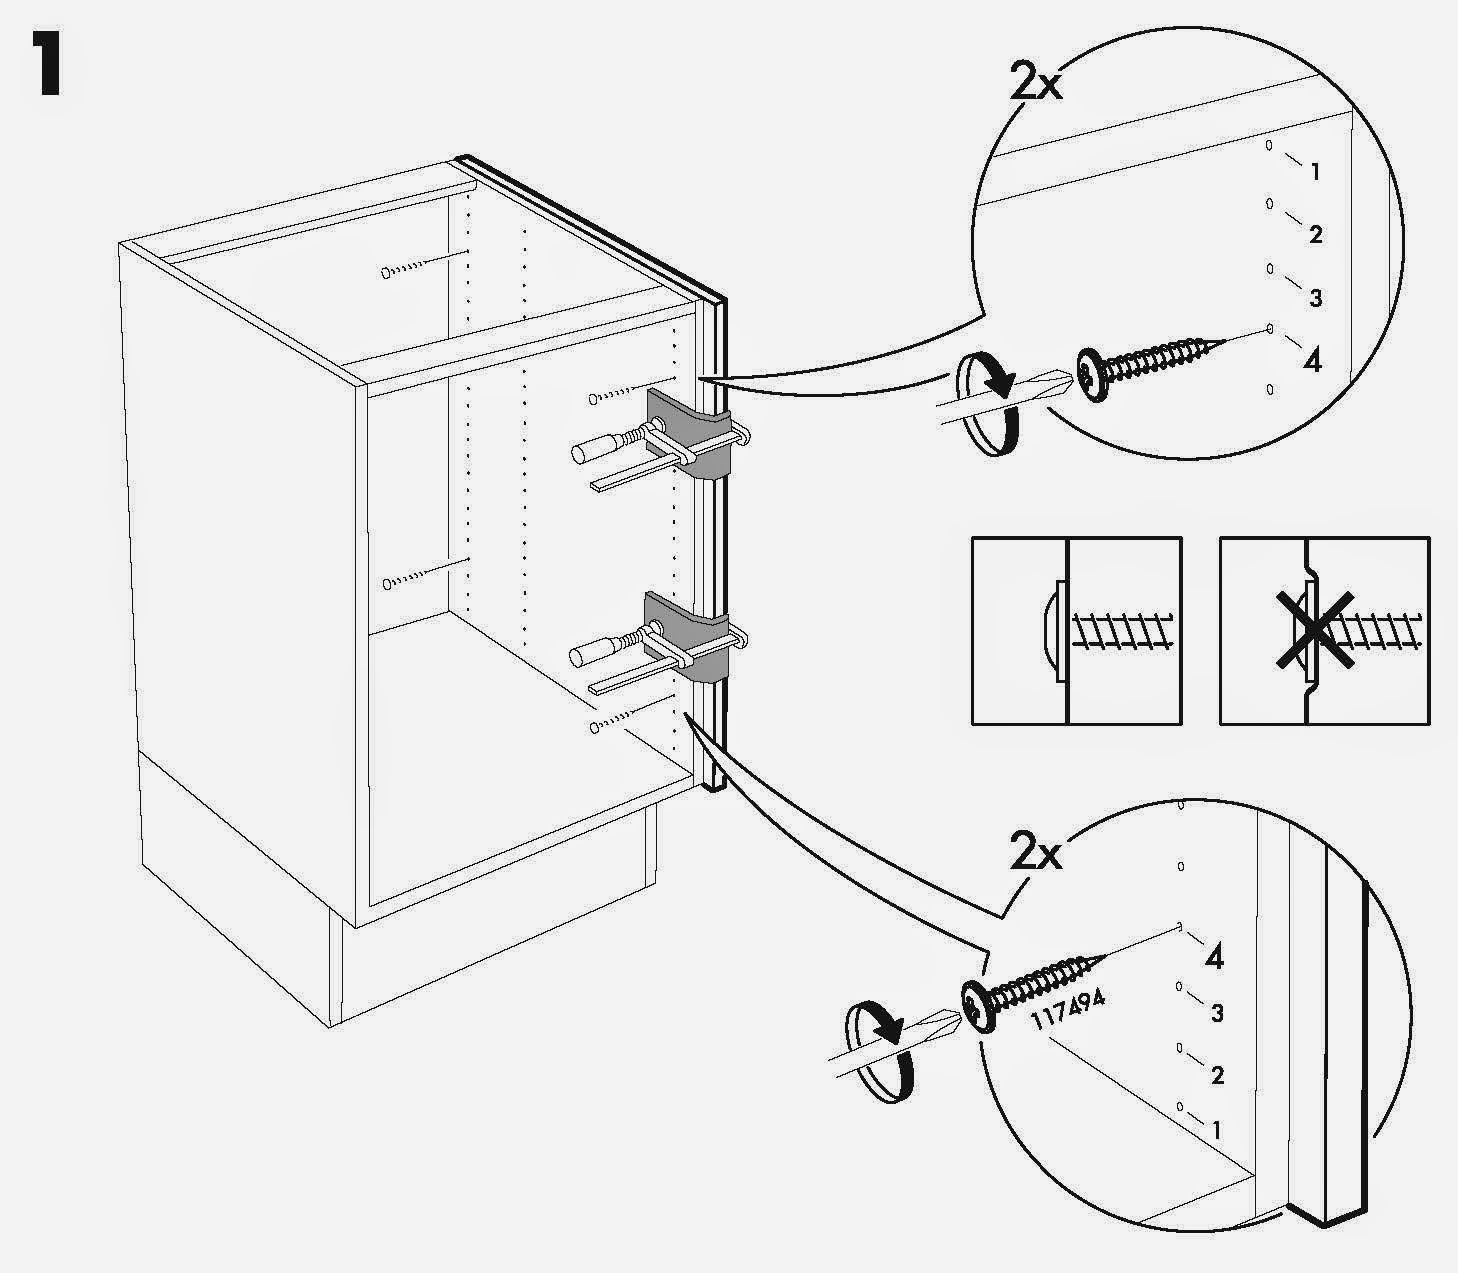
Big mistake. When it came time to install the drawers, which hole do you think a majority of them use? Read the directions for your drawers before deciding which holes to use. For most we were able to drill and connect through the 5th holes.
Color Match Your Paint. I wanted a built-in look so, we added a simple crown molding to the tops of the upper cabinets. I took a cabinet door into Sherwin Williams and they color matched it to a gallon of ProMar 200, (I get a contractor's discount so I use this line). If you don't want to do that, use the formula I did for a perfect match to the Adel off-white cabinets:

Order a Regular Shelf for Above the Refrigerator Cabinet. Since all the other cabinets came with shelves, I assumed the one above the fridge would too. Nope. When I tried to order one while I was back at the store I found something else out. They do not make full size shelves for these cabinets. They don't exist, so don't try to harass it out of the nice lady trying to help you. It won't get you anywhere. You might think that because these cabinets look like they are the full 24" depth. Because they are hanging on the suspension rail, they are actually short by a couple inches. This means that the base cabinet shelves which are 24" will not fit. I had to purchase a 12"x36" shelf pack after the fact, which was only $12 and came in a pack of 2. It made a hug difference in the organization of the cabinet, and I wish I knew that this was something I had to verbally add on during the ordering process.

Take Your Time. This is the most basic advice, but it's true. Whether it’s designing the using the Ikea planner, or assembling the cabinets. Also, Don't start assembling the cabinets while angry. It'll just mess with your brain and you will start making mistakes. Mike's an experienced carpenter and has built many things from scratch, but he went in knowing these were going to piss him off, and you know what, it did! Go in with an open mind, and it'll go quickly as long as you stay organized!
Utilize the planner. This is pretty basic, but the planner not only helps you design, but it also helps you visualize the kitchen. I made about 5 plans, each a little different than the others and modified based on those. I narrowed it down to the two I was confident in. We contemplated the positions of our fridge and range, and visualizing with the planner helped determine the layout we liked best.


I second guessed myself about the black lowers for a second, but seeing the kitchen all together in the planner, helped give me the confidence that it was going to turn out awesome!


I hope that anyone undertaking an Ikea kitchen can learn from our experience and the things that I wish we had known at the beginning. If just one of these helps someone from having to make a 3 hour round trip, or from re-drilling the base cabinets together, than my little hobby of blogging is worth it! Has anyone else put together Ikea cabinets only to find something out after the fact? Any tips or tricks you may have let me know!


If you installed the 3 inch trim piece flush with the cabinet and installed the side panel so that the over hand extends above the top of the cabinet-isn't the panel wider than the box? Did you trim a notch out of the panel above the cabinet so it's flush with the 3 inch trim piece? What did you do? Thank you so much for sharing your wisdom and experience!
ReplyDeleteAwesome post! Thank you! We're planning our Ikea kitchen in the next year and I need all the advice I can find. Your kitchen looks beautiful too. Well done!
ReplyDeleteThanks Erin! I learned a lot from reading about others experiences, but there were still things that popped up along the way that I wished I had known about before. Good luck with your Ikea kitchen!!
DeleteWhere did you purchase your light fiztures from?
ReplyDeleteErica, the light pendants are from etsy: https://www.etsy.com/listing/114522270/biddeford-glass-pendant-light-large?ref=shop_home_active_23
DeleteGreat kitchen! I'm planning a similar configuration, with a fridge across from the end of my peninsula. How much space did you leave between the front of the fridge and the end of the peninsula, and was it enough?
ReplyDeleteWe have about 36" between the fridge and the edge of the peninsula. This is from the actual fridge and not the door handles (the handles stick out about 2-3"). This was our biggest concern, and it's not been an issue at all. With the french door fridge it's even possible to stand in front of the opened door and allow someone to pass, granted you have to be comfortable with that person because it's a tight fit ;) but we don't notice any inconvenience.
DeleteA couple of questions. Were you able to get the ikea planning software to represent your counter bar? When you added the shallow shelf to the over the fridge cabinet, did you need to drill new holes?
ReplyDeleteCheers! Your kitchen looks great!
Thanks Sarah!
DeleteWe weren't purchasing our counters from Ikea so I didn't worry about the software showing the extended surface. We used the older version (we used the AKURUM system) so maybe the newer version would have that capability? I created a fake wall on the one side so I knew what the dimensions were even though the kitchen is now one room with the dining room. The best bet would be to do this, then talk to a kitchen department employee at your local store. I'm sure they've run into something similar before, or have a solution.
As for the fridge cabinet, it has 3 sets of holes as opposed to the 2 for the regular wall cabinets so no drilling was necessary!
Hope this helped!
Beautiful kitchen Mallory!
ReplyDeleteWell, we almost made it home to completion, but my husband and I just had a bit of a blowup due to intense frustration...
We researched tons, talked to Ikea kitchen owners, and tried to take our time as much as possible. We bought the design service to reportedly protect ourselves, spent a lot more on Ikea installers to, again, reportedly protect ourselves against mistakes, and we bought acrylic countertops through Ikea which we love. Our personal contractor is wonderful and we hired him for our floors and all the extras.
Everything is finally in and he just left for the day after installing the final details like the faucet, outlets, and dishwasher. We had purchased the fully integrated Renlig dishwasher with the matching Brokhult panel. So our contractor simply couldn't get that dishwasher pushed back to the wall to be flush with the other cabinets-- which, to me, is one of the beautiful details of these kitchens.
In all the design plans, it lists the dishwasher as 24" and the plans denote a 24" depth throughout.
I finally found the discrepancy--in the dishwasher installation manual (in a non-descript area, rather hidden): "For panel-ready models, dishwasher depth is 24" not including the 3/4" custom door panel." Ugh! Clearly, the cabinets should have been extended further out before everything was secured and the countertops installed. I'm so discouraged tonight because our contractor said there is no room at the back drywall to push it back further, implying we may need to take off the countertop to pull the cabinets forward and order a new, deeper countertop.
I am stunned that this "miss" on the part of the designers/installers not allowing for some kind of spacers to the cabinets has been known for at least two years... what a waste of time and money...
Sorry for the long post and we'll see if tomorrow brings a better day. Love your blog, thank you. :)
Annette Read
Chesterfield, MO
ReplyDeletewhat a darling boy! And thanks for the helpful Ikea info!!
If you’re still responding to questions....is your fridge counter-depth?
ReplyDeleteWe are doing a retrofit wall of cabinets to frame in our fridge on a wall across from the rest of the kitchen. It will have a few tall pantry cupboards and then a cabinet above the fridge. Our fridge is full-depth and I’ve read on a few blogs that I’ll need to bump out my cabinets by 4” so that it looks flush across the front with the fridge. In your pictures, your fridge looks flush so did you build out or is it a shallower fridge? Thanks.
Hi Laura,
DeleteYes, our fridge is counter-depth. Because of this I'm not familiar with what modifications you'll need to do with the surrounding cabinets, but I would assume that bumping those out 4" or so would work, as well as the top cabinet above the fridge. Good luck!